
I didn’t actually realize how long this project had been in the works until I sat down to write about it. For those who follow me on Instagram, you might remember the stories I posted about this hutch. I found it last year in May and HAD to have it. The problem, it is HUGE, weighs a ton and we don’t have a truck to haul it with.
I convinced my husband to let me rent a U-Haul truck, I picked it up (the guys at the warehouse loaded it for me) and I brought it home. My husbands only Mother’s Day gift to me was to help me get the hutch into the house. Oh, and we live on a hill (driveway is also sloped) and had to get it up 2 sets of stairs to the spot it lives now. After trying to lift the hutch out of the truck initially (which was a fail) we removed all the doors and shelves in hopes of making it lighter. Nope. It was all we could do just to get this beast into the garage. And there it sat, for almost a year before I forced my hubby to move it again. This time, I bought some furniture moving straps. They helped, we were able to move it, but it was still a pretty tough time. Moral of the story, we will not be starting a furniture moving company, EVER. And, I’m never allowed to buy a large piece of furniture again without first finding someone to get it in the house 🙂
I got this hutch from Habitat for Humanity Restore, one of my favorite places to find old furniture. What drew me to this piece was the storage space and the metal detail in the upper cabinet doors. I thought for sure I would spray paint the metal black OR put chicken wire in the doors. I ended up doing neither because I really liked the items on the inside of the upper cabinets being front and center.
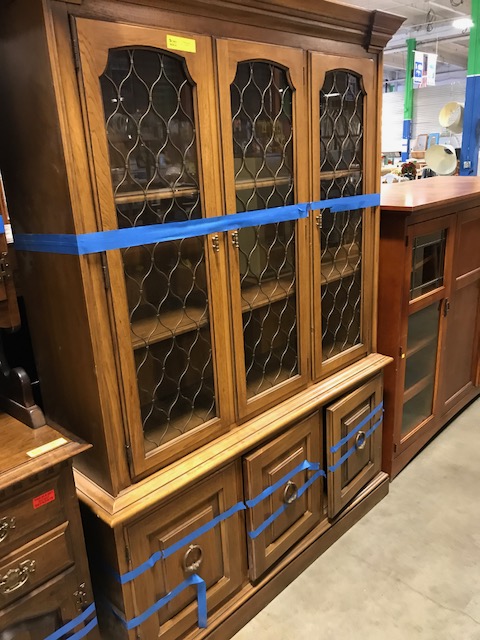
What I look for in old pieces are lots of nooks and crannies and raised edges in the wood so that there is lots of opportunity to sand and get the worn edges easily exposed. Like this…

I started off this project by removing all the hardware. There were about 10 different types of hardware on this hutch, between knobs and hinges on the outside, and springs and magnets on the inside. I kept everything together in plastic sandwich bags, separate by type, because I wasn’t sure what I was going to reuse and what I was going to toss. Although, I was pretty certain I was going to toss the original knobs, but we’ll get to that later.
Of course, I went with my tried & true pure white chalk paint. I started this project using Heirloom Traditions chalk paint but quickly ran out. I had picked up some Amy Howard chalk paint, decided to give it a try and I AM HOOKED! It has a great consistency and covers SO MUCH BETTER! Plus, from the looks of the product line, it seems like Amy Howard has all sorts of different finishes you can add to create all types of looks on your furniture. I am so excited to try some of them out in the future.

I used the One-Step Chalk Paint in Bauhaus Buff and then took my corner cat sander to all the edges to give the hutch a roughed up look.

I found this hardware at Orchard Supply & Hardware. I loved the hammered detail and that it was black. It tough to find rustic hardware in stores. Most of it is just online but I’m so bad at choosing that sort of thing online. I need to see it in person, ya know? I went with these Hickory Hardware Mountain Lodge Black Iron Cup Pulls on the bottom doors. Technically, this type of pull is used for a door that pulls straight out, like the drawer on a dough table but I just couldn’t help myself. And, I was able to drill some new holes and place the pulls directly over the old holes so I didn’t have to use any wood filler.
On the upper doors, I went with the matching Hickory Hardware 3-inch Mountain Lodge Black Iron Cabinet Pull. I had purchased new hinges but it is pretty hard to find hinges in any color other than gold or silver except in the a classic size door hinge. I didn’t want to use the original hinges because they were pretty rusty and a little tough to open and close. But, the rust actually made the perfect match for the other hardware so…old hinges it was.

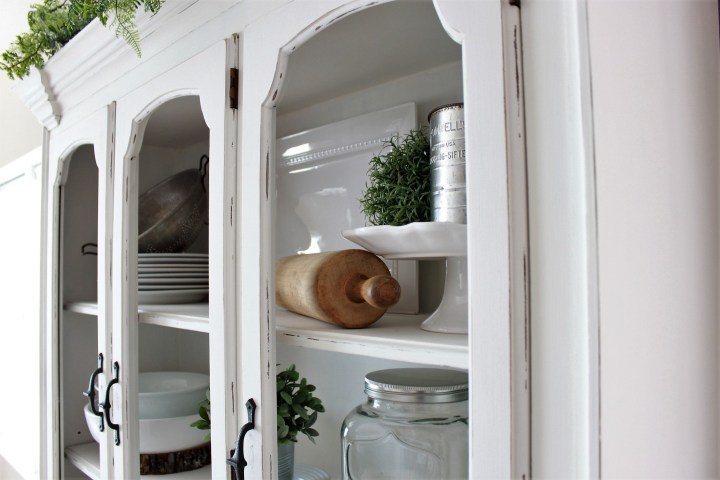
Now back to these doors…I went back and forth about how to finish them. Use the original glass and metal lattice? Use chicken wire? I couldn’t use just the glass very easily because the glass and lattice secured with these little spring loaded latches and they didn’t reach far enough to hold the glass in without the extra thickness of the metal lattice. Did that make any sense at all? Anyway, glass without metal wasn’t an option unless I wanted to figure out how to reattach the glass. I had the main part of the hutch as well as the bottom doors all finished and I loved it so much that I started styling upper cabinets with my white china and all the fun antique kitchen items I found while out antiquing with my mom. By the time I was done, I was obsessed and wanted to just leave it the way it was, no doors at all. However, it still looked a little bit undone. My next thought was, attach the doors with no glass, no wire, nothing. Bingo!

Gotta say, pretty excited about how it turned out. There’s something about a china hutch…I never really thought I’d have one in my house. Somehow felt “old”. Man have I changed my tune 🙂
You are very talented
Thank you Gloria! 🙂
What a beautiful transformation!
Thanks Mindy!! 🙂
This looks so worth the effort. It came out really good!
https://www.bluelabelsboutique.com
https://www.fashionnotfear.com
Wow. You are amazing and definitely have an eye for this sort of thing. Looks beautiful!!
Aw 🙂 Thank you Jackie!
Great job! I wouldn’t even know where to start!
Thank you! 🙂