You know the best way to wake up early on a Tuesday morning? To the sound of your dog getting sick. I mean, nothing gets you to jump out of bed and on your feet faster. And then try going back to sleep after that. Two things that I thought would be an issue having dogs with a baby or small child. 1) That the dogs would take or chew on the baby’s toys and 2) the dogs are going to get a little “thicker” when the baby starts eating solid food and can therefore feed the dogs 🙂
Until now, neither have been an issue. The other day, Landon was sitting on one of his little chairs that has toys attached to it, eating a teething biscuit. By the way, teething biscuits have to be one of THE messiest foods I’ve ever seen! Anyway, my mother-in-law was cleaning him up after he finished and Ella, sneakily and one by one, grabbed the toys which were now covered in biscuit crumbs. The toys were (<– notice how I said “were” not “are”) those round plastic rings, bright colored that stack on a cylinder and form a pyramid. Super flimsy and took no time at all for Ella to demolish while trying to eat every crumb she could find. I found the leftover plastic under our bed with some of the consumed plastic making it’s appearance this morning.
Welcome to our little slice of crazy town!
We have been so lucky to have some amazing photos taken over the last year and a half since finding out a little babe was on the way. Something I’ve been so bad about, in recent years, is displaying personal photos at home. This, to me, is such a down side to all the technology we use on a daily basis. Our photos are all contained on phones and computers and rarely make their way onto paper and into our homes. Why? One of my favorite things in other people’s homes is seeing all their personal photos, their family & friends, big events, love. I am resolving to have more photos printed and finish my home spaces with this personal décor detail.
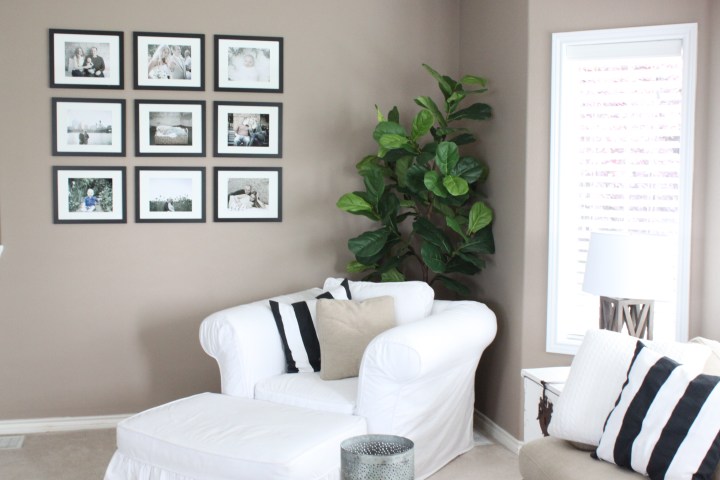
I had this large wall space in our living room and went back and forth about what to put there. We did have a gallery wall in the house before, but it was all wedding photos and the location wasn’t a noticeable spot where people would stop to look at it. I asked Jeff if I should replace the current gallery wall or move it to the large wall in our living room. His response, “put it in the living room so we will actually see it everyday and enjoy it”. Yes! Too often, gallery walls are hidden on stairwells and in hallways where people don’t see them as often. Bring those photos to a prominent location!
I went with a grid style gallery wall, very uniform and pretty easy to put together. I have seen some gallery walls that are asymmetrical and I do love them, but I am just too “straight line, symmetrical, matchy-matchy” for that style. Maybe someday I’ll step outside my comfort zone, but until then, here are a few tips to help you create your own grid-style gallery wall…

1. Determine the space and size of your gallery wall
Figure out where you are going to put your new gallery wall. Chances are, you already have a blank wall in your home that you struggle with filling or decorating. Next, think about how big you want the gallery to be. This will give you a measurement from top to bottom and side to side and help you know what size and how many frames you can fit in your space. For instance, my space was about 42″ x 51″. I had a pretty particular look I wanted, so I had already picked out the frames and therefore knew the exact measurements. I used an 11×14 frame that was matted for an 8×10 photo, plus the width of the actual frame, it left about 2″ between each photo if I did 3 across and 3 down. This part may take a little configuring, just be sure to measure the actual frame because depending on the thickness of the frame, it can add an additional 1-2″ to each photo.
2. Choose your frames
Here’s a tip if you want a uniform look, use a frame with matting. This will help separate the photos from each other as well as “tone down” the photo so that each picture isn’t competing with the one next to it. I was going for a black & white theme and found these frames for an amazing price at Michael’s. This frame is normally $23, but Michael’s regularly has sales on their frames and they usually do it by brand. These were 60% off last week!!! While they are no longer on sale, they do have a few other brands on sale right now. If you find one you like that is full price, it’s worth it to just keep checking back for sales.

3. Choose your pictures & print
For the uniform grid look, you need to choose all vertical or all horizontal pics. I know I know, duh! But, I started picking out photos and then realized I was choosing both and had to go back and do it again! Another thing I did for uniformity was adjust the color of the photos before printing. The main reason I did this is because I used photos from all different photo shoots and 2 different photographers who have very different editing styles. Some of the photos were bright, vivid color and some were more muted. Plus, with different outfits and backdrops in each shoot, it just made for a lot of different looks going on. By adjusting the color, it helped make all the photos look more like they went together. I don’t have any fancy photo editing program, just the one that came loaded on my computer. All I did was edit the saturation of the photo to pull some of the color out. When I found a color level that I liked (I used -65 but it will probably be different on all computers/programs) I adjusted all the photos to the same level. Note: When you do this, make sure you “save a copy” of the photo, don’t save over the original, just in case you don’t like it, plus, you don’t want to loose the integrity of the original photo. Obviously this step isn’t necessary. I also did this because of the black & white look I was going for. I wanted to use my favorite photos but I didn’t want them completely black & white so this allowed me to get the look I was going for while still keeping a little color. As far as printing, if you are using professional photographs, chances are, your photographer will have a suggestion as to where to print them for the best quality. Our photographer uses Smugmug, but also suggests Shutterfly as a good place to print.
4. Hang your photos
I’ll be honest, I was not super technical with this part. I hung the center photo where I wanted the center of the gallery to be. For the photos directly above, below and beside the center photo, I just measured out the height or width of the frame, plus an additional 2″ for the space between each photo. Because I was just sort of winging it, I did have to make some adjustments. Just step back and check after you hang each photo because it may look even up close but once you step away you’ll be able to tell for sure. If you want to be more technical about it, you can pick up a laser lever at the hardware store. This one from Lowe’s is $20, attaches to the wall and will easily get the job done. If you are using a laser lever, your laser line is going to be where you hammer the nails into the wall so be sure to adjust down a bit from where you want the top of the frame to be.

Now go get those photos printed and start enjoying them! 🙂