I’m back!!! It has been SO long since I’ve posted! I’m so happy to be back and have all sorts of great content planned for the next few weeks.
Since I’ve been gone, hubby and I went to Hawaii on a little getaway. The trip was absolutely INCREDIBLE and we fell in love with the island of Kauai, so much so, that we didn’t want to come home.


Is it possible that vacation withdrawals are a real thing? Because I’m pretty sure I had them…severely…once we got back, I just could not get motivated to get back into my normal day-to-day routine.
I am beginning to get back on track. Starting with my latest project! A DIY industrial pipe T.V. stand for our guest bedroom.

I decided on this style of shelf for a few reasons…
1) Our guest room is not huge, more so because of the huge bed I put in there, so I wanted a piece of furniture that was pretty narrow
2) There are a lot of weird angles in this room as well so there were not a lot of spots to place a t.v. stand in conjunction with the bed placement
3) Due to the size and weird angles, there is not a lot of room for furniture other than a nightstand and this t.v. stand so I also wanted it to be able to hold some décor to dress up the room.
So, this is what I came up with! This is also the first time that I really made a piece of furniture from scratch, with no building plan or instructions. There was certainly some trial and error involved, as well as multiple trips to Lowes.
A couple of notes on this furniture piece. For the cast iron pipe, I used all 3/4″ diameter pipe, this pipe is also available in 1/2″ and 1″ diameter, if you want the frame slimmer or bulkier. The overall measurements are 82″H x 55″W x 18″D.
Supplies
6 floor flange fittings
4 4″ black pipe
6 closed nipple fitting
20 tee fitting
8 12″ black pipe
2 48″ black pipe
8 18″ black pipe
2 30″ black pipe
2 24″ black pipe
2 black iron cap
4 2″ black pipe
2 90 degree elbow fitting
4 1″x 12″x 8′ whitewood boards cut to 55″ long
1 can matte black spray paint
stain of your color choice to stain boards
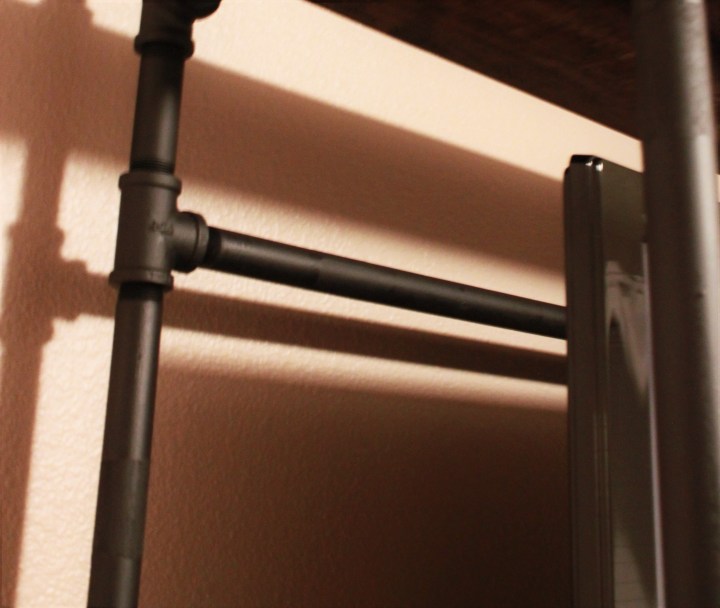
Step 1: Build the base. Use 4 floor flange fittings as the feet and space them about 50″ apart across the width and about 1 foot apart through the depth. To the 2 front feet, you are going to add a 4″ black pipe on each side. To the 2 back feet, you are going to add a closed nipple fitting to each side, followed by a tee fitting on each side (with tee edge pointing toward the opposite back foot), and then 2 more nipple fittings on top of each tee.

Step 2: Add crossbar. Take 1 48″ pipe and attach to the two back feet by screwing one end into one of the tee fittings you just attached. The trick to getting the crossbars attached is to screw them all the way into 1 side, then join the other end into to opposite side tee fitting. You slightly unscrew the first side in order to attach to the opposite side. Each end will be halfway screwed into each tee fitting but should still feel secure. If it doesn’t feel secure, try screwing and unscrewing again. It took me a couple tries but if it’s done right, you should reach a point where the cross bar fits well into each tee fitting.

Step 3: Add shelf bracket. Using 4 tee fittings, attach to each foot with tee edge facing back to front or front to back. Then using the same method used to attach 48″ crossbar, do the same with 2 12″ pipes to create a spot on each end for the boards to sit, forming the shelves. (See same picture above for reference)
Step 4: Construct second level shelf. Attach 4 18″ pipes to each corner creating the level between shelf 1 and 2. Repeat step 3 to create the bracket for shelf 2.

Step 5: Construct third level shelf. Repeat step 4 to create the bracket for shelf 3.

Step 6: Construct fourth level shelf (taller space for t.v. to sit). Use 2 30″ pipe and attach to 2 front legs. Use 2 24″ pipe and attach to 2 back legs. On back legs, repeat step 2 to attach another crossbar for stability. Attach 2 tee fittings to back legs, tee edges facing each other. Add 2 4″ pipe on top of tee fittings to back legs. Use 1 48″ pipe, attach to the tee fittings as the crossbar.
Step 7: Add top shelf bracket. Repeat step 3 to add fourth and final shelf.

Step 8: Add top finishing touches! Use 2 closed nipple fittings, add to front legs. Finish front two legs with 2 cap fittings. On back to legs, add 2 2″ pipes, followed by 2 90 degree elbow fittings (elbow edge pointed toward back side of unit), followed by 2 more 2″ pipes and finished with 2 floor flanges. The floor flange will sit flush against the wall and you will attach the unit to the wall with screws for more stability.

Step 9: Stain or paint your shelves, attach the frame to a wall and place shelves on brackets. Now decorate!! Note: I did not attach the shelves to the pipe in anyway. To be honest, I’m not sure what the best way to do this would be. For now, I don’t have little ones that I need to worry about pulling on the boards, but if I decide to figure out how to attach the shelves I will certainly update you.

I don’t know if Jeff is even aware of this, but his Dad also loved Kauai! He spent a lot of time hiking all over the island….he also told me that at one point, he considered buying a place there.
…Patti
>
I completely understand why David loved it! The island is so luscious and the hiking there is incredible. We were looking at properties for sale as we drove around the island 🙂