
I’ve been wanting to do this project for a while. Especially because I’ve been spending so much more time in the bathtub these last few months. I wanted the spa-like relaxation but, truth be told, I also wanted a place to set my laptop so I could get some blog work done while I’m unwinding. And, after baby comes, it’ll be a handy place to set my wine glass too…can’t wait for wine again!
This project was SO quick and easy. I think it took maybe an hour total. It should be pretty easy to customize it to your own bathtub since the measurements are so minimal.
Supplies
Pine Project Board
(To find the size that best fits your bathtub, you’ll need to measure across the top of your tub and keep in mind you’ll need a few extra inches in length for it to hang over to attach some “feet” to help hold it in place. As far as the width, that can just be your preference. I used a 1″ thick x 12″ wide x 48″ long board, linked above. I wanted plenty of width for my laptop as well as all the pretty bath supplies I was about to buy)
1×2 pine board
(This is for the feet, the length you need will depend on how wide you main plank board is. Example, my board was 12″ wide so I needed 24″ of 1″x2″ board to trim out the sides of my tray)
handles
(You don’t have to add handles to your tray but it’s a nice decorative touch. You can get simple drawer pulls at any hardware store or if you want something with a little more style, World Market, Hobby Lobby and Anthropologie are great places to look. I got mine at Anthropologie and linked them above)
jigsaw
wood glue
1 1/4″ finish nails
measuring tape
pencil
drill and drill bits (if you are adding handles)
paint color of your choice
Step 1: Measure the exact width of your plank board and cut 2 pieces of the 1×2 pine board to that length
Step 2: Lay your pine board across the top of your bathtub, place one of the cut 1×2 pieces up against one side of the tub, flush with the edge of the pine board. Hold the pine board in place, hold a piece of 1×2 against the side of the tub (on the opposite side) then use a pencil the mark a cut line on the pine board. Cut the pine board along the cut line.
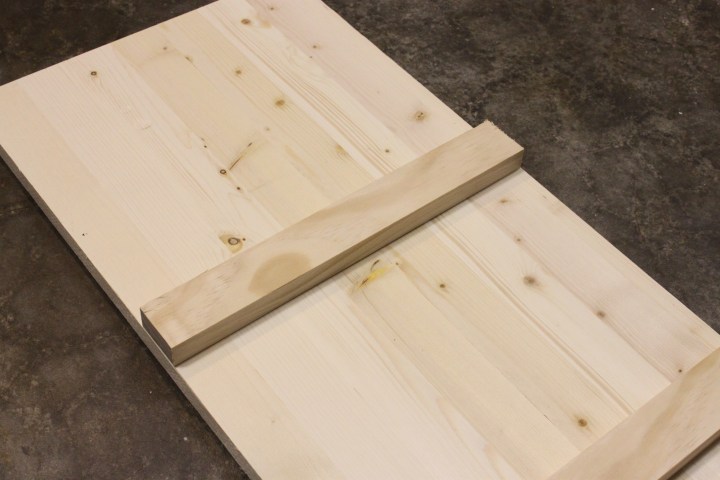
Step 3: Attach the 1×2 “feet” to the pine board, flush with the edges using wood glue and 1 1/4″ finish nails on the underside.

Step 4: Drill holes for handles. Choose a drill bit that is just slightly larger than the screws on your handles. Choose the location for your handles, I placed mine so they would sit just inside the edge of the tub.

Step 5: Paint in color of your choice and distress. I used Heirloom Traditions chalk paint in A La Mode then sanded the edges slightly with 150 grit sandpaper.
Step 6: place across your tub and add all your favorite bath supplies

I’ve always loved Anthropologie but lately I’ve been extra obsessed with all their home décor, especially their candles and giftable items. I knew they had a cute little bath & body care area so I decided to look there to stock up on supplies for this project. The brands are a little spendier than say Target, however the packaging, quality and scents are incredible and well worth the money for this type of thing…in my opinion. Here are links to all the products I purchase…
Barr-Co Original Scent Bath Salts
Barr-Co Bubble Elixir
Mediterranean Sea Silk Sponge
Baudelaire Cedar Bath Brush
Voluspa Glass Maison Candle in Bourbon Vanille
Hope you enjoy your swanky spa space as much as I’m enjoying mine!
Nice~